Wednesday, November 2, 2011

Sugar Cookies with Sprinkles

This is a very simple and easy recipe!  I used store bought cookie dough because I wanted to focus more on the technique than testing a sugar cookie recipe.  I am pretty sure any sugar cookie recipe will work with this.  They are colorful and provide a new cookie idea to add to your cookie swap offerings around Christmas this year. A great way to get the kids involved with cooking!


Yield:  around 2 dozen


1 chilled roll of Pillsbury (or favorite brand)  Sugar Cookie Dough
Couple of tablespoons of red and green sugar Sprinkles


Preheat oven to 350* and grease cookie sheet.


Cut chilled cookie dough into thirds. Pour a couple tablespoons of red sprinkles onto small salad plate.   Take 1/3 of cookie dough and roll in red sprinkles.  Slice dough into 1/4 inch thick slices and place on cookie sheet.


Pour green sprinkles on salad plate and roll another 1/3 of the dough in the green sprinkles.  Slice the dough and place on cookie sheet.  


Repeat the steps with your favorite sprinkles for the remaining dough.  


Bake cookies according to direction, around 7-10 minutes.  


Place on cooling rack to cool and serve with a tall glass of milk.  


These would be a perfect treat to leave out for Santa on Christmas Eve!


Sweet Dreams,
Cindy

Thursday, October 13, 2011

Twice Baked Potatoes

Sorry for the long break from the blogging world. My husband and I have moved back to the Mid West and have been busy house hunting and settling into our new routines.  I wanted to blog about a bunch of new recipes I have tried, but sadly I have my camera in storage so I haven't been able to take pictures of my cooking.  I always hate cookbooks that don't include a picture of the finished product, so I will wait to post those recipes until I am reunited with my camera.  I have some pictures of recipes stored on my computer so I will be blogging about these recipes in the meantime.  Since it is now fall, I will be uploading some warm and hearty recipes great for the cooler weather. 


Let's start with an all-time favorite: Twice Baked Potatoes!  Very tasting and not too much work.  These are great to put in the freezer and then at the last minute just reheat and enjoy.  I have used these at Christmas as a starch instead of mashed potatoes. They are great paired with pork tenderloin, chicken, fish, or steak.  They even make for a nice lunch the next day. Give these a try and I am sure all of your family will be requesting you to make them again.


Twice Baked Potatoes  Yield: 8 servings


4 large baking potatoes
4 slices of bacon
1/2 cup milk
1/4 cup sour cream
2 Tbsp butter
salt and pepper to taste 
shredded cheddar cheese for topping


Wash potatoes and prick with a fork.  Bake potatoes in 375* oven for 45-60 minutes, depending on size of potatoes.  


While potatoes are baking, cook 4 slices of bacon in a skillet and drain on paper towel.


When potatoes are done, allow to cool for 10 minutes.  Cut each potato in half lengthwise.  Scoop out inside of potato leaving a little around the edges.  Place potato skins in greased baking dish. 


Mash the potato you scooped out with milk, sour cream, butter, salt, and pepper.  Add additional milk if needed.  Place the mashed potatoes back inside the potato skins.  Top with crumbled bacon and shredded cheese.  


Return to oven and cook for 10-15 minutes until cheese is melted and potato is heated through.


Helpful Tip:


If you are in a hurry, you can cook the potatoes in the microwave on a baked potato setting. Just prick with your fork and wrap the potato in a wet paper towel.  You could also cook the bacon in the microwave by placing the slices on top of 2 paper towels and topping with an additional paper towel.  Cook 3-3.5 minutes until crispy.  Mash the potatoes, scoop into skins, top with cheese and bacon crumbles, and return to the microwave for an additional 2 minutes.  


Sweet Dreams,
Cindy

Thursday, August 11, 2011

Bruschetta

This is a very flavorful and easy appetizer!  The recipe might be a new idea for all those ripe summer tomatoes and fresh basil you have in your garden!


Yield:  12 servings


1 French Banquette (I use my Basic Bread recipe and form skinny, long loaves) 
3 ripe Tomatoes, diced
Handful of fresh Basil leaves
1/3 cup Parmigiano Reggiano grated cheese (could also use Parmesan or Mozzarella cheese)
drizzle of Olive Oil
salt to taste


Thinly slice bread on a slant and place on a baking sheet. Brush with olive oil.  Sprinkle with salt. Broil on high 2 minutes each side or until toasted.


Stack basil leaves on top of each other.  Roll long ways and thinly slice to get strips of basil.  Combine basil, diced tomatoes, and cheese in small bowl.  May sprinkle with salt if prefer.  


Spoon mixture onto toasted bread slices. It may help to use a slotted spoon so you don't get too much juice from the tomatoes on the bread, causing it to get soggy.  


Arrange on platter and serve with appetizer napkins.


Sweet Dreams,
Cindy


Tuesday, August 9, 2011

Refreshing Iced Tea

The perfect drink for a hot summer day!  I have been making a fresh pitcher of this stuff at the beginning of each week and it has really helped to beat the summer heat! Sometimes you get tired of chugging glasses of water and want a little more flavor to quench that thirst.  This is easy to make, refreshing, and great to have on hand for any guest who may stop by for a quick visit.


Yield:  2 quart


6 tea bags--- (I use Green Tea bags or Decaffeinated Orange Pekoe Black Tea)
2 quarts Water
1/3 cup Sugar
Ice
Mint leaves, lemon optional


Pour 3 cups of water into a sauce pan and bring to a boil.  Remove from heat and add tea bags.  Let steep for 5 minutes.


Add ice and sugar to pitcher and fill half way with cold water.  Stir.


Remove tea bags.  When steeped tea is cooled down a bit pour into ice pitcher.  You will want to make sure this is not hot water so you don't crack the pitcher.


Stir to combine.  Add more water if necessary to make a full pitcher.  Add lemon juice and mint leaves if you enjoy the taste.


(I added a couple of Sweet Basil leaves to this tea and it offered a very nice flavor)


Serve in glass filled with ice and relax while sipping this delightful beverage!

Sweet Dreams,
Cindy

Monday, August 8, 2011

Vanilla Cake with Strawberry Buttercream

This cake was delicious!!  I baked 4 layers and it looked very impressive when served at a dinner party over the weekend. The one negative about the cake, besides the fact that you will have to run a marathon after eating a slice to burn off all the calories, was the gigantic size of each slice.  I had to use dinner plates to serve them on since each slice was so tall.  Overall, it was a very tasty cake that made mouths drop when I brought it out.


Yield: 1 8in 4 layered cake: 20 servings


2 boxes White cake mix plus ingredients to prepare cake mix (usually eggs, water, and oil)


To make cake:


Prepare cake mixes and bake according to directions.  Making sure to grease and flour cake pans so you can easily remove baked cake from pans to cooling rack. Cool completely 

(greased and floured cake pan for easy removal)


To prepare Chocolate Covered Strawberries for decoration:


1 pound strawberries
1/2 bag chocolate chips


Wash and cut off leaves from strawberries.  Cut strawberries in half vertically.  Pat dry.
Melt half a bag of chocolate chips in microwave bowl.  Microwave in 30 second increments stirring in between until completely melted.  Dip flat bottom of strawberry in melted chocolate.  Place on waved paper to harden.

(I did not use a whole pound of strawberries. I just picked the biggest and prettiest ones and used the rest for the strawberry puree)


Prepare Strawberry Buttercream:


6 sticks of salted butter; room temperature
2 Tbsp to 1/4 cup strawberry puree
3 pounds powdered sugar


Blend about 5 strawberries in a blender to make a strawberry puree.
Mix (at high speed) room temperature butter with powdered sugar, alternating and scrapping down sides of bowl.  Add enough strawberry puree, to taste, making sure buttercream does not get too runny.  I added 1/4 cup to start with and went from there.  Buttercream should be fluffy but stiff. (You may need to add a couple drops of red food coloring to get a nice pink shade)


Assemble cake:


Level any cakes that may have cooked unevenly.  I usually have a dome cake and need to use a serrated knife or cake leveler to make each layer even. Please save scrapes of cake for husband to snack on while assembling :)


Place one cake layer on cake platter.  Spread top with strawberry buttercream for your filling.  Top with another cake layer followed by strawberry buttercream.  Continue until all cake layers are stacked and topped with frosting.


Spread a thin layer of buttercream around cake sides and top.  This will be a crumb coat.  It does not need to be perfect and it is okay to see some cake.  You are just trying to get a thin coating of frosting to hold your cake together and prevent crumbs from getting on your final layer of frosting. Make sure you are filling in any gaps between the layers and also the bottom of the cake platter. Cool in fridge for 1 hour loosely covered with plastic wrap.


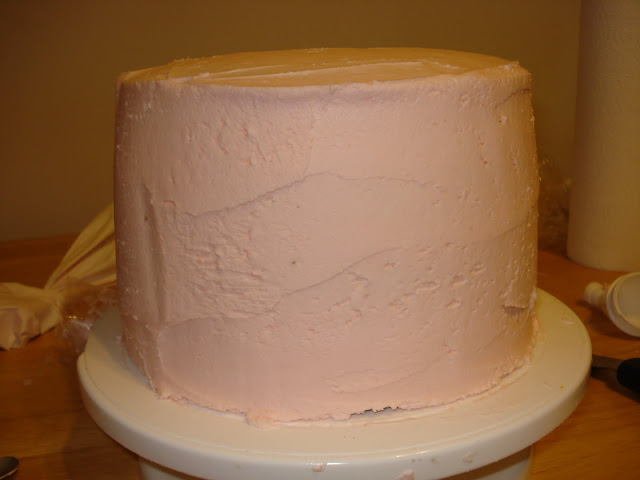
Remove cake from fridge and spread a thick final layer of frosting along sides and top.  You can use an off-set spatula or butter knife to spread frosting. It may help to frost cake on a turn table but it is definitely not necessary.  Allow buttercream to crust by letting it sit for 10 minutes.

 (This is a picture of the final thick layer of frosting before it was smoothed with a a paper towel.  Notice that I used a turntable to help spread the frosting and I also used large pastry bags to apply frosting... both are totally optional and can be accomplished with just a butter knife or offset spatula.)

(Instead of decorating directly onto the cake platter, I set my cake on top of 8in cake boards found in the baking supply area of craft stores or Wal-Mart.)  Once I was finished smoothing the cake I CAREFULLY picked up the heavy cake using a large offset spatula and my hand.) 


(Large off-set spatula and butter knife.  Either can be used for applying frosting to cake)


Next, lightly touch buttercream and if it is not sticky then it has crusted.  If you are trying to get a perfectly smooth cake here is an AWESOME TIP I use for making my wedding cakes.  Take 1 sheet of a Viva brand paper towel. Lay along side of cake.  With your hand, Gently rub the side of the cake smoothing out any lines.  Start smoothing on the sides and then finish off with the top of the cake, trying to get smooth edges.  The heat from your hands helps to melt the butter just enough to make it fill in any bubbles or lines.    You should be able to use 1 paper towel for the whole cake.  If frosting comes off onto paper towel you are either pressing too hard or it did not crust completely.

(Here the Viva paper towel is against the side of the cake and my hand is gently rubbing to smooth out any lines or bubbles)


Lastly, take chocolate covered strawberries and place around the bottom of the cake.  I also covered one whole strawberry in chocolate to place on the top.

 (This above picture is the true shade of pink for the frosting.  You may need to add a couple of drops of red food coloring to get it this pink since adding more strawberry puree will loosen the frosting too much)


Serve to your sweet-toothed crowd and enjoy with a glass of cold milk!


Sweet Dreams,
Cindy


Friday, August 5, 2011

Steak Salad

Whenever we make grilled London Broil, we always have leftovers.  It is easy to turn these leftovers into a quick and healthy meal.  I cut up any veggies we have in the fridge, sprinkle on some cheese, toast some homemade croutons, and toss with lettuce to create a steak salad that tastes so amazing you would never know if was a leftover meal.


Yield: 4 servings


Head of Romaine lettuce
Half head of Iceberg lettuce
3 carrots sliced or grated
4 Roma tomatoes cubed
green and black olives sliced
1/4 red onion thinly sliced
1 cucumber sliced
1/2 jar marinated artichoke hearts and peppers
blue cheese crumbles (or your favorite cheese)
croutons
salad dressing of choice
leftover London Broil Slices


Wash and chop lettuce, carrots, tomatoes, olives, cucumber, onion...whatever veggies you prefer in salads or have on hand.  You could even you a salad mix to make this even easier. Sprinkle cheese and croutons on top.  Lay London Broil slices on salad.  Drizzle with favored salad dressing (I used Blue Cheese but Caesar is also a favorite).


Enjoy cold with a glass of iced tea!

Thursday, August 4, 2011

Homemade Tortillas

With only a couple basic ingredients, you can have soft and warm tortillas in no time!  I like to make these at the beginning of the week when I plan on making tacos for Mexican night and then use any leftovers for sandwich wraps later in the week.  You can turn these into homemade chips by cutting into triangles, brush with oil, salt, and bake until crispy.  The original recipe I found said to use shortening, however, I hardly have that on hand if I am not baking cakes, so I substitute vegetable oil and it always turns out wonderfully.  Give these a try and you will never buy store bought tortillas again!


Yield: 12-15 tortillas


2 1/2 cups flour
1/4 cup oil
3/4 cup hot water
1 tsp salt


Combine ingredients in a large bowl and knead to fully incorporate.  


Divide dough into equal portions.  Cover and let rest 30 minutes. (Usually I am impatient and cover dough with damp paper towel while I am rolling each ball out instead of waiting the full 30 minutes).


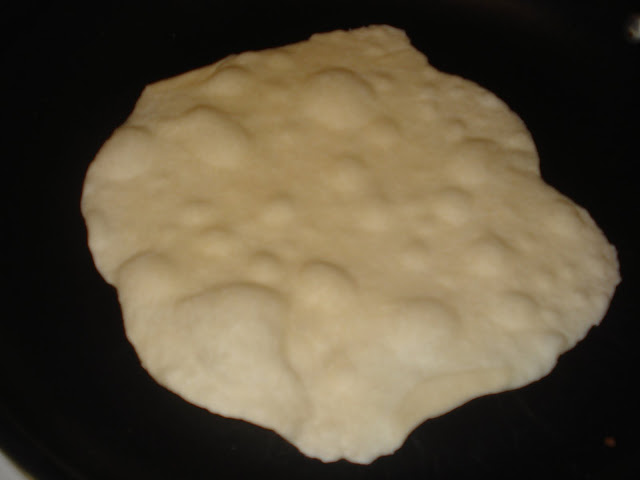
On a lightly floured surface roll out dough with rolling pin until as thin as possible.  I usually make mine the size of a frying pan and thin so I can almost see the counter top through it.  


Cook in skillet over medium high heat about 30 minutes each side popping any bubbles that form.  


Cover with towel to keep warm while making the rest of the tortillas.  


Store in Ziploc bag.


Sweet Dreams,
Cindy

Tuesday, August 2, 2011

Eggplant Parmesan

This is a wonderful recipe to make when you are craving some Italian food but what something a little different than the typical pasta with red sauce.  My husband always requests extra cheese and I make sure to use Hunts Four Cheese Premium pasta sauce to give it even more flavor.  This cheesy sauce combined with fresh eggplant, basil, and rosemary from the garden make one perfect meal.


Yield:  4 servings

1 eggplant
1 (26 oz) can Hunt's Four Cheese Premium pasta sauce
1 1/2 cup grated mozzarella cheese
1/4 cup Grated Parmesan or Romano cheese
salt

Cut eggplant into 1/2 inch thick slices. Lightly sprinkle salt on each side and let rest on paper towels for 30 minutes to remove moisture from eggplant.


Place eggplant on baking sheet and bake 350* for 20-30 minutes turning half way through.

Place a ladle full on pasta sauce in greased 9 x 9 casserole dish.  Lay single layer of eggplant on top. Sprinkle on some cheese, basil and rosemary.  Pour some more pasta sauce on top and layer again with eggplant, cheeses, and herbs until all ingredients are used up, ending with cheese on top.


(yes, I ran out of mozzarella cheese and had to use Colby cheese.  Still tasted delicious!! )


Cover and bake in 400* oven for 30 minutes. Remove foil and bake until golden browned.

Serve with fresh salad and homemade bread!


Sweet Dreams,
Cindy